by RAB (rab46), 10/25/12
Note: This article was written and submitted by a BGE user.
Battlegrounds Gaming Engine is a virtual table top program that has been developed to create electronic versions of wargames, board games, card and dice games. Note that due to copyright issues, you must own a copy of the game that you are converting and you may not distribute a game file after you’ve created it.
Background
I’ve been playing board wargames for 40 years, predominately solo games. Three years ago I began playing games using virtual table top programs. Although the games feel slightly different, there are distinct advantages. I don’t need a lot of real estate dedicated to game board set up, I can play several games at the same time and they can travel with me on my lap top.
My first exposure to one of these programs was Cyberboard. Later I found Vassal and ZunTzu. None of these really fit my needs completely. Cyberboard was geared toward play by mail. Vassal modules were feature rich but I couldn’t easily create modules for games I owned, nor could I modify them to suit my play style. I was able to get my games into ZunTzu but there was very little customization possible.
Then about one year ago I stumbled into BGE. I was immediately intrigued by the description of the program on their website.
I downloaded the demo and gave it a test drive. I began working on creating a module for Silent War by Compass Games. There was some trial and error involved, but the manual that is provided was reasonably complete and I was able to puzzle my way through most issues. When I got stuck, the BGE forum and the developer were very helpful in clearing up my confusion. By the end of the first week I saw enough potential in the program to justify the purchase price, which is quite reasonable by the way, and purchased the program.
I now have several of my games converted. U-Boat Leader and Thunderbolt and Apache Leader by DVG games, Nuts! by Two Hour Wargames, Silent War by Compass Games and Lock’nLoad’s Forgotten Hero’s-Vietnam to name a few. And all of this with no programming required on the user’s part. Games are assembled from images by pointing, clicking, selecting and positioning. You don’t have to know anything about programming or XML editing, the program takes care of that. This lets you concentrate on creation of the game. In an effort to help others appreciate the flexibility of this program I would like to provide some examples from my latest conversion, “Patton’s Best” by The Avalon Hill Game Company.
Conversion of an Old Classic
“Patton’s Best” (PB) is a solo wargame that relies heavily on tables. There are four pages of reference tables. These tables in combination with dice rolls are the enemy AI and handle combat and random game events. There is a long sequence of play to work through for each game with sections of the sequence repeated sometimes dozens of times. Lots of things to remember, and I have a very poor memory!
The first step is to create the images you’ll need for the game. You have to scan in game boards, counters, tables, segments or rules,… well you get the idea. This has taken me from two hours to probably 24 hours. The time required depends on the game. Games that have a lot of cards take the most time. For PB I estimate I spent 8 hours scanning material.
The first thing I do is create the mapboard. This involves stitching together the mapboard scanned sections into one large graphic. Then I add any play aids that will remain stationary on my “table”. I use GIMP for doing this. These images are then “locked down” so they remain stationary by either making them the game board or using a feature called tiling. Either one of these conditions make these images non-selectable in the background to allow you to manipulate counters on their surface. The mapboard image remains in the background permanently. Tiled images can be released temporarily for manipulation, then re-tiled. More on that later.
Here is what my playing surface looks like:
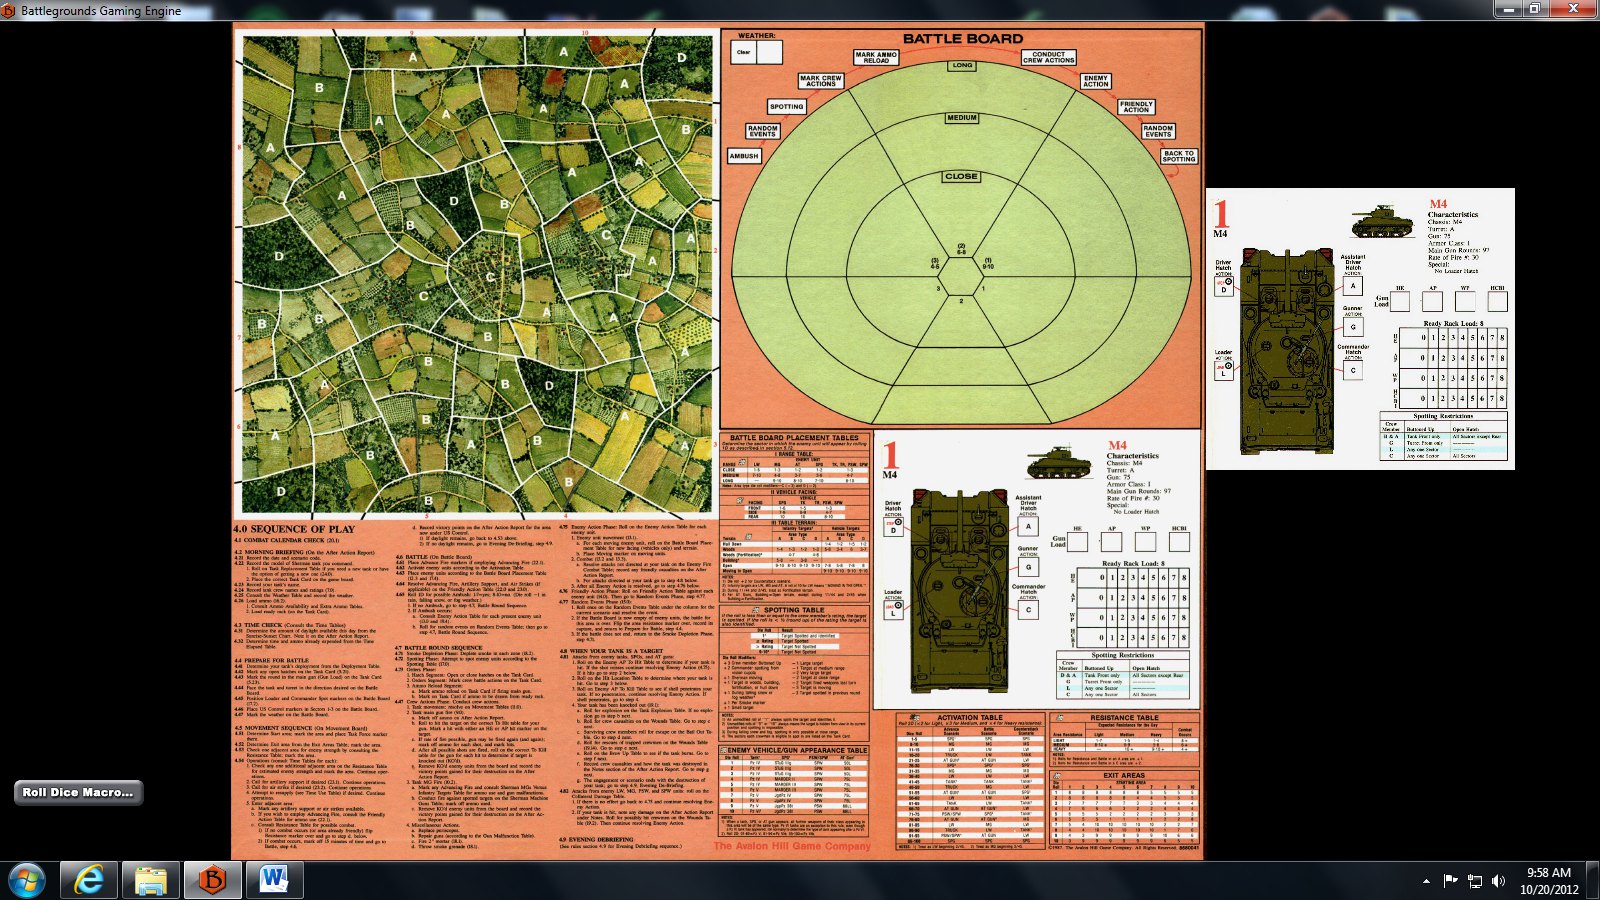
The upper left corner is the task force movement board. Play starts here, with your task force traveling across the terrain until a battle is triggered by enemy contact. Activity then transfers to the upper right corner, the battle board and the lower right corner which is the tank card and used to record tank crew actions. The lower left corner is a summary of the sequence of play.
As you can see, the board is barely legible at this scale. I handle that by breaking it into areas of activity based on how the game flows and then creating views for each of those areas. BGE makes this easy. You zoom in or out with the mouse wheel until you get the size you view you want and then lock it in on the View Palette and set it up in the View Manager. In this case I created a view for the movement board and the battle board with tank card adjacent to it.
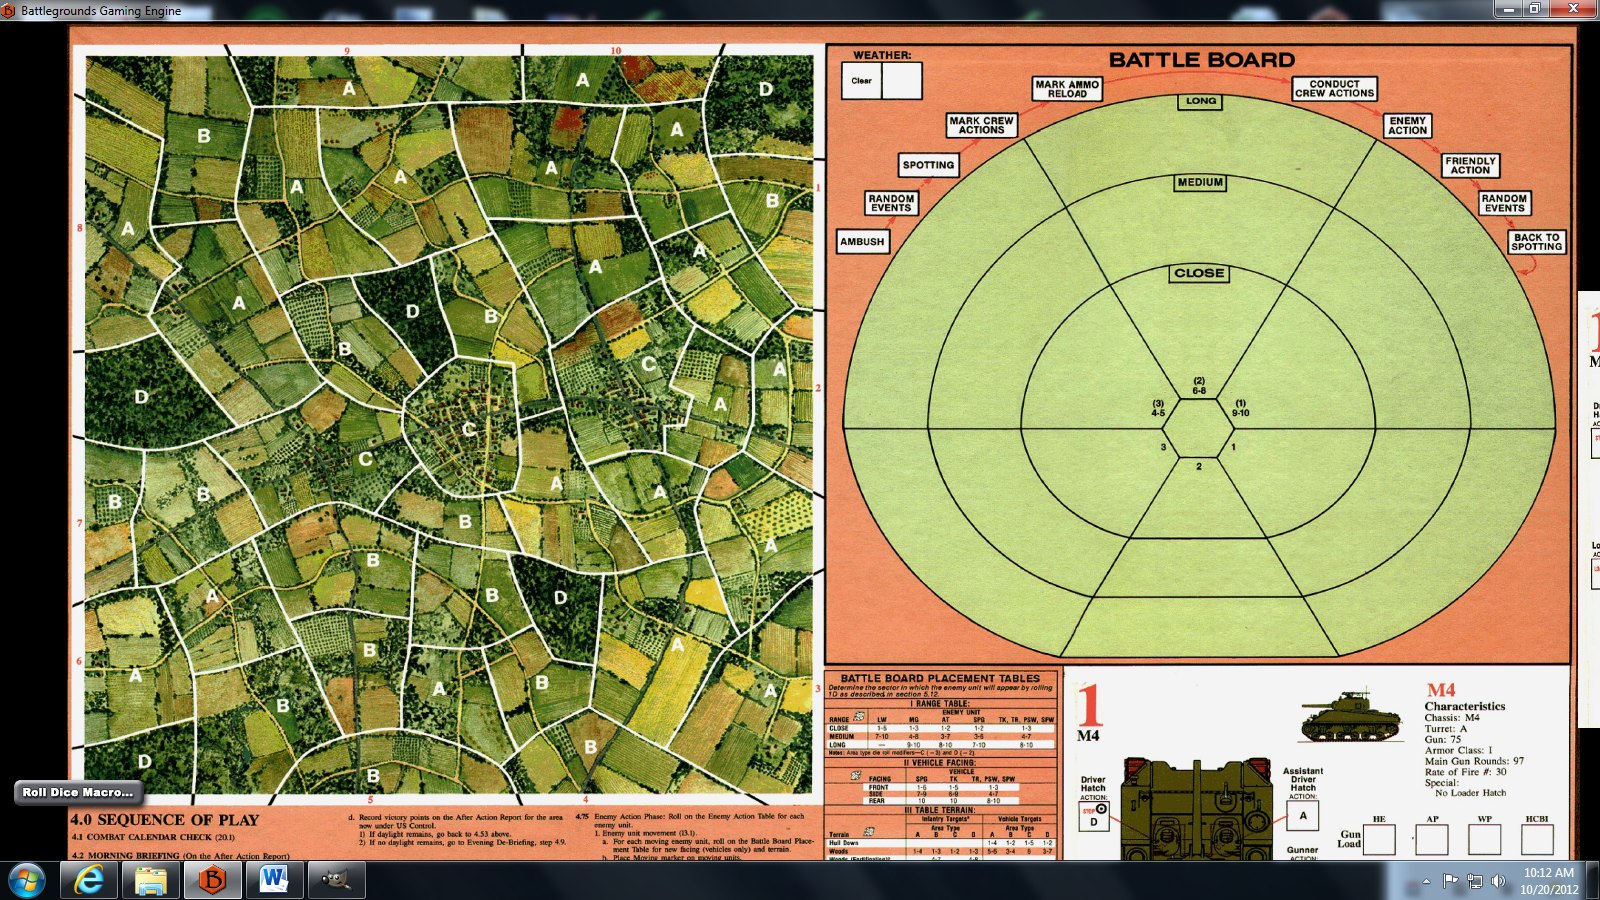
Here’s the movement board:
And here is the battle board with tank card:
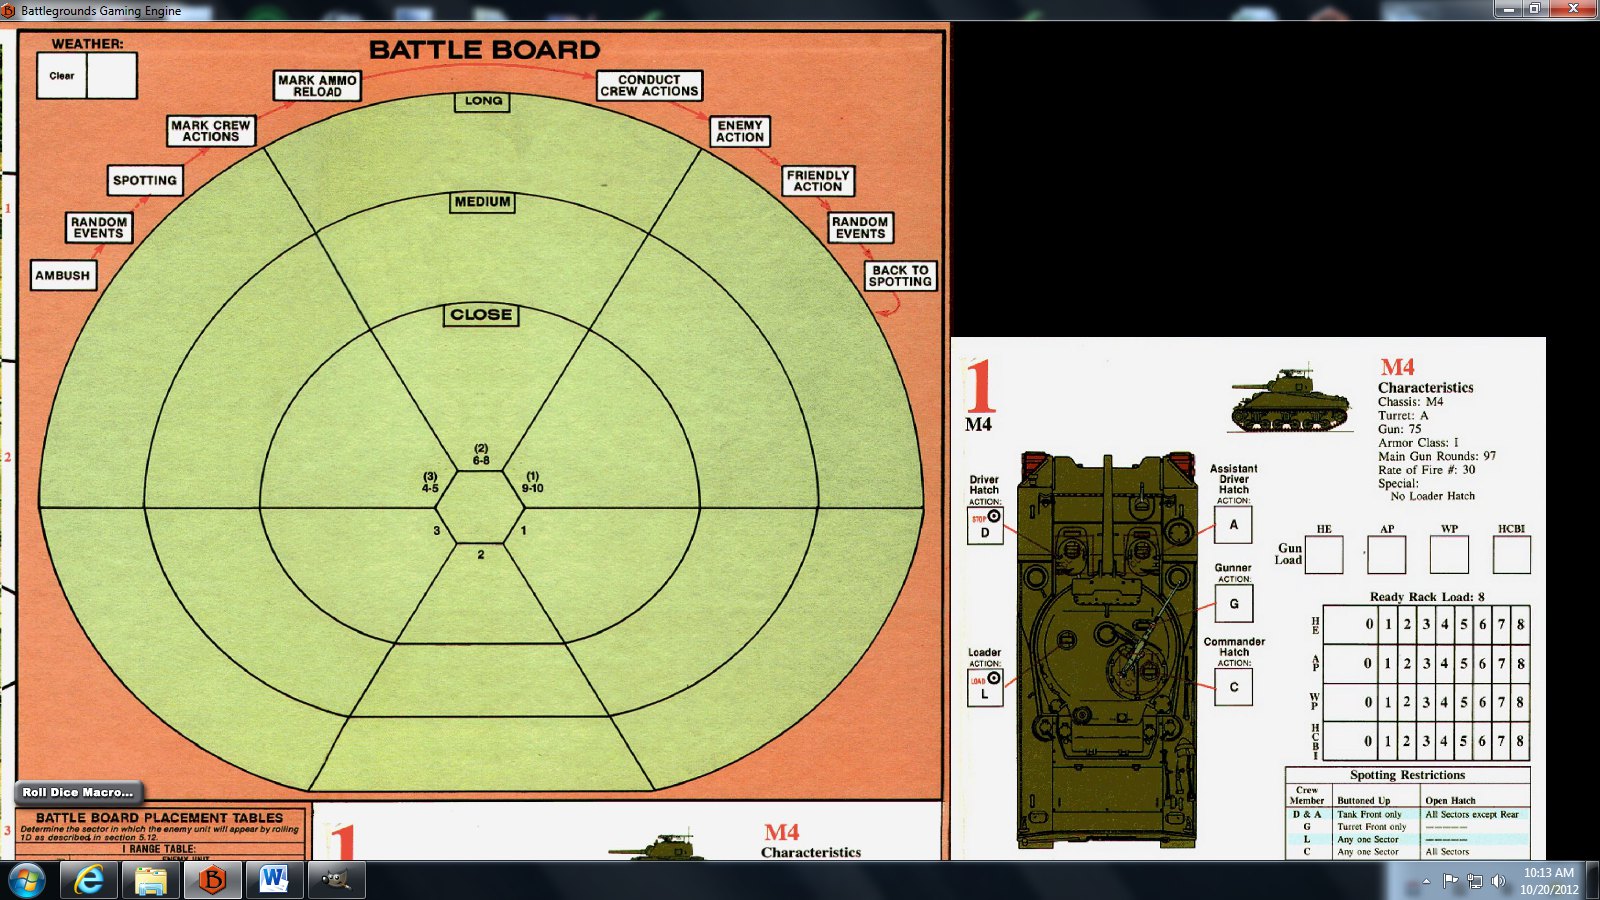
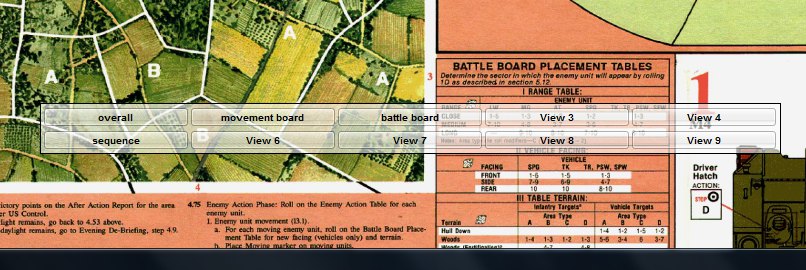
At this scale, counters will be discernible so I’m good to go. Play flows from upper left to upper right then back again. To move from view to view you can use the View Palette or hot keys associated with each view. Here’s how I’ve set up my View Palette to move between views:
Later I can add additional views that jump to counter and marker holding areas outside the play area if it’s useful. One last feature that is indispensable. You can drag components from view to view by selecting the components you want to move, holding down the left mouse button and selecting another view with a view hotkey. Magically the components are moved to the new view. I use this feature all the time as games play out.
Now, returning to tiling. The tank card pictured on the playing surface is actually a component that has 15 other images associated with it which are variants of the basic M4 Sherman tank. The additional tank cards are the upgrade path for your tank as you progress through campaigns. But the game requires placing other counters on it to track crew actions and ammunition load status. Selecting and manipulating counters on top of other counters is problematic. Attempting to select the top layer counters can resulting in accidentally selecting the bottom image. To permit the tracking counters to be manipulated, the tank card has been given a special status called ‘tiled’. You tile a component by selecting the command from a contextual menu which can be brought up by right clicking on the image. This command pins the image in place, making it a static image until you release it. When the time comes to upgrade to a newer tank I simply remove the tile status from the lower tank image and select the desired image with either the ‘<’ or the ‘>’ key. When I have the tank variant image I want, I place the card in the background with the ‘]‘ key and tile it in place. At this point I’m good to go with my brand spanking new tank.
Counters
Counters are image files that are dropped onto the playing surface by double right clicking on the surface and selecting a file. Counters are either components or minis within the program. These two types of counters share some characteristics but also have unique qualities.
The ability to add multiple images to the counter and cycle through them with key presses is extremely useful. For example, in PB enemy units are placed on the battle board in an unknown state and stay that way until they are identified. So I created a counter for each class of enemy unit (infantry, armor, anti-tank gun etc.) and combined them all in one counter. I start by placing the counter with the image representing the unidentified threat face up. After I identify it I simply cycle through the images until I get to the correct image. So the counter starts out as the one on the left in the unknown state and ultimately becomes one of the tanks to the right when identified:

No more fumbling for counters, just press a key until the correct image is displayed!
Another small but useful feature is the component note feature. This allows you to add what are essentially tool tips to a counter. The text is displayed when you hover the mouse cursor over the counter. So, using the tank counter example above, every unknown tank is considered a specific type for battle resolution until it is identified. So if I hover the mouse cursor over the counter above, here is what is displayed:
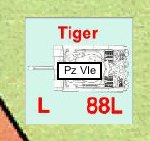
Did I mention that I have a very poor memory? This feature saves me from having to remember all the little details. If I want to be reminded of something related to a counter I simply place it into the counter note and I have it available instantly.
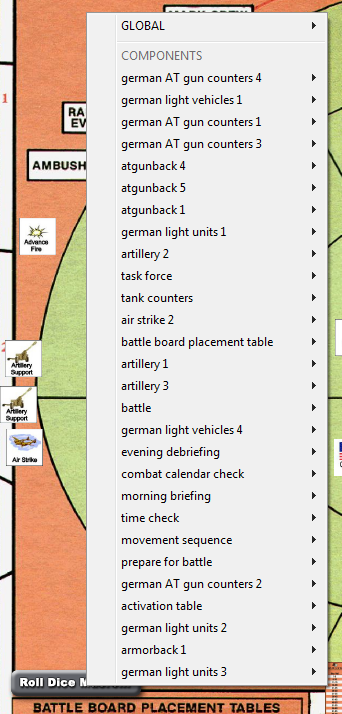
Counters can also have images linked to them that display on the screen when the component is selected. These are called portraits in the program. This image can be the component image or any other image you desire. For instance, I frequently create a component from a game table, reduce it in size so it doesn’t gobble up a lot of valuable screen real estate, then link the full size image to the reduced image so I can pop it up when I need it. Here’s an example of one of the many reference tables in PB that I created using this technique:
As an added bonus, the reduced image can be set on the playing surface so it stays in one spot, or it can be made to “float” so it holds the same position on the screen regardless of where you relocate the playing surface. Notice that I also labeled the reduced image table with a text note just in case I can’t recognize the table when it is reduced.
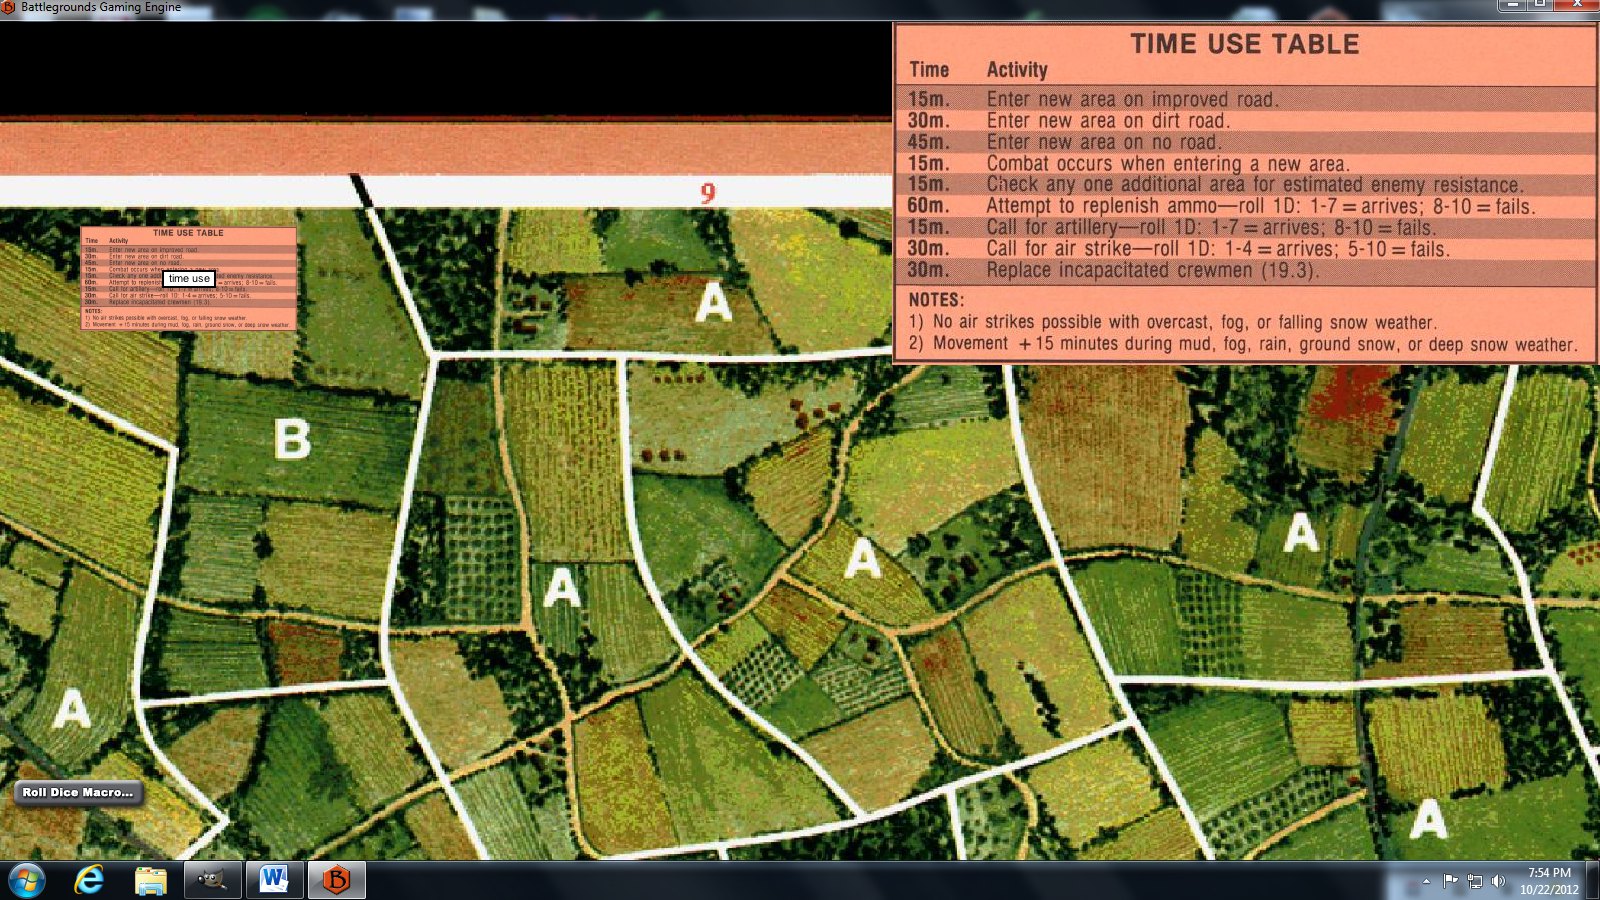
Remember my bad memory? I use the portrait feature to create playing sequence reminders for myself. Just create a labeled button image, plop I down on the screen somewhere convenient and attach a scan of the playing sequence to it as a portrait. Instant recall, or as close as I’ll ever get to it! Here is an example that shows one of the nine sequences in PB. The image to the right of the screen was called up by pressing or hovering over the button labeled “4.7 Battle Round Sequence” in the lower left:
Trust me, even though it looks small in this image, it is quite legible on the screen. This saves me countless hours of digging through the manual as I play.
Rolling the Dice
Dice are the heart of PB. All enemy actions, all friendly actions and most actions directly associated with your tank are determined by dice rolls cross referenced to tables. This game is a real dice roll fest! BGE makes handling all of this rolling pretty painless. Pretty much any dice configuration you’ve ever seen is available from within BGE. You can roll single die, or multiple dice simultaneously. Most any die you want in various colors are available. Many custom dice images are provided. As a last resort, if a die image you want is not available, you can create your own.
Dice rolls you know you will repeat frequently can be set up with what are called “dice macros” for instant recall and use. Dice macros can be called from a button that stays resident on the screen in the lower left corner, associated with an image of a die and rolled by selecting the image and pressing Ctrl-R, or associated with a component and called from a contextual menu associated with the component.
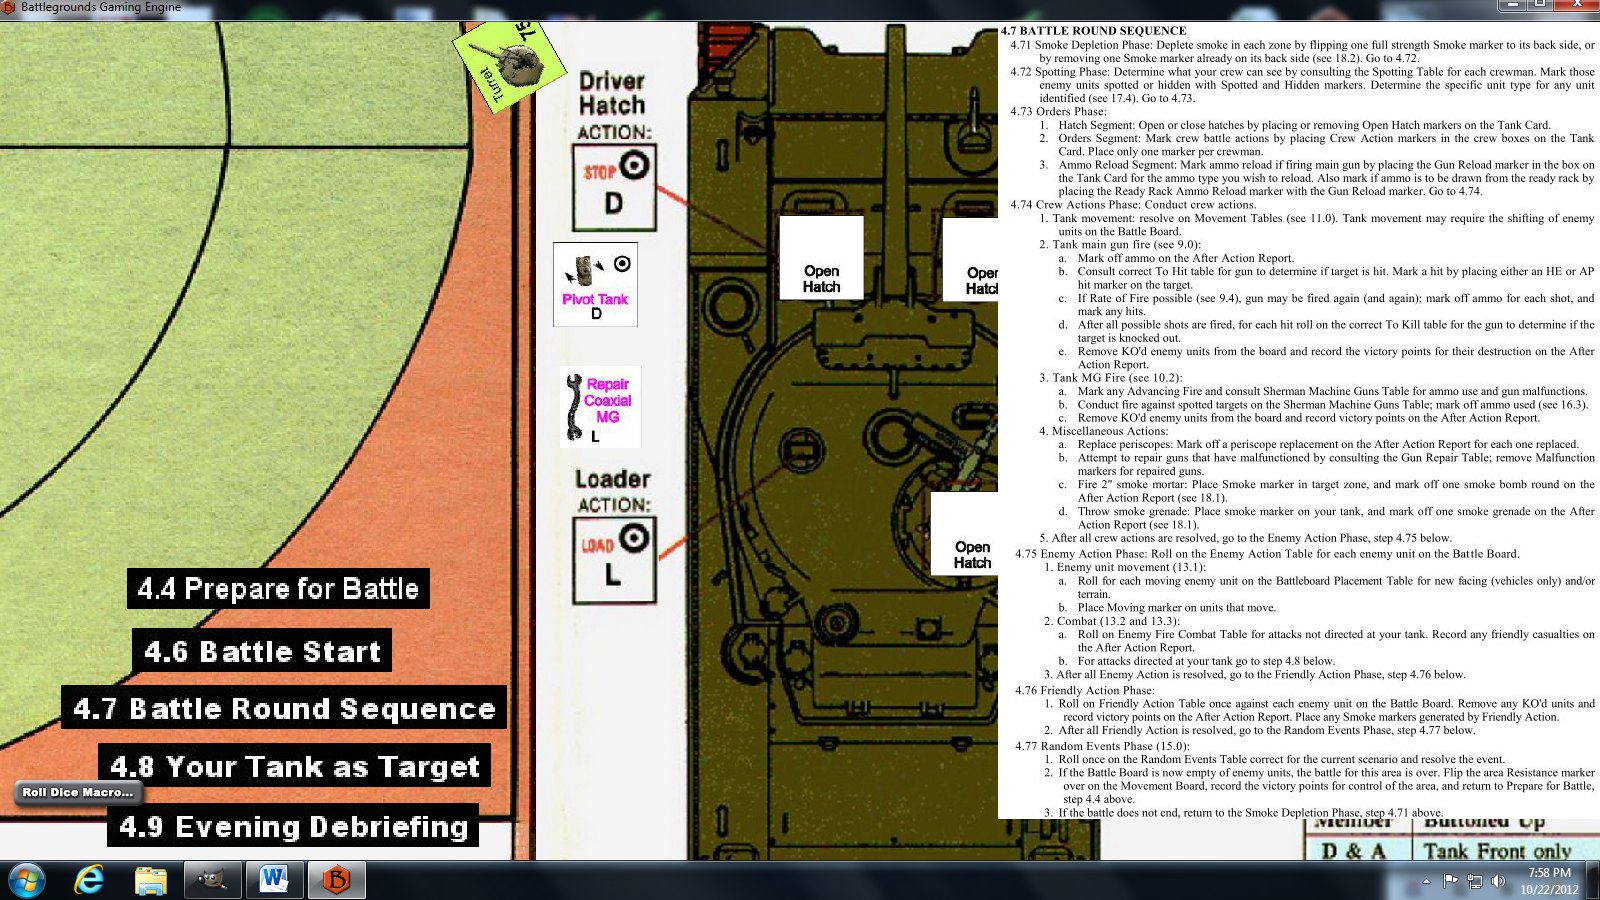
Here are the dice macros I have built for PB which can be called from the “Roll Dice Macro” button:
Even though some of these are duplicates and assigned to a counter, there is still a lot of dice rolling going on! I can pick a macro from here, but I often prefer to associate a macro with a specific counter. I like the convenience of being able to left click on a counter and specify a roll. Let’s take a look at an example of a dice macro associated with a counter.
This is the artillery counter. There are two rolls associated with this counter; one for the success probability to arrive when called, the other for resolving the impact on arrival. Here is the contextual menu that is generated with a left mouse click and the list of dice macros associated with this counter:
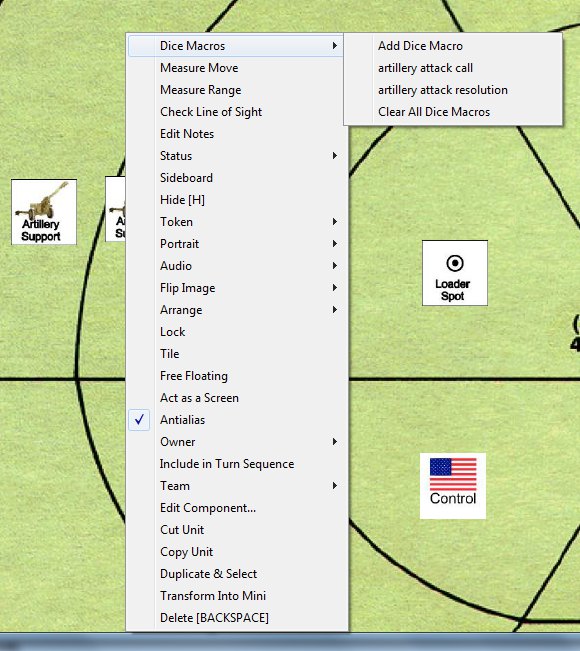
To determine if an artillery attack arrives you select the artillery attack dice macro from the submenu and you end up with this result:
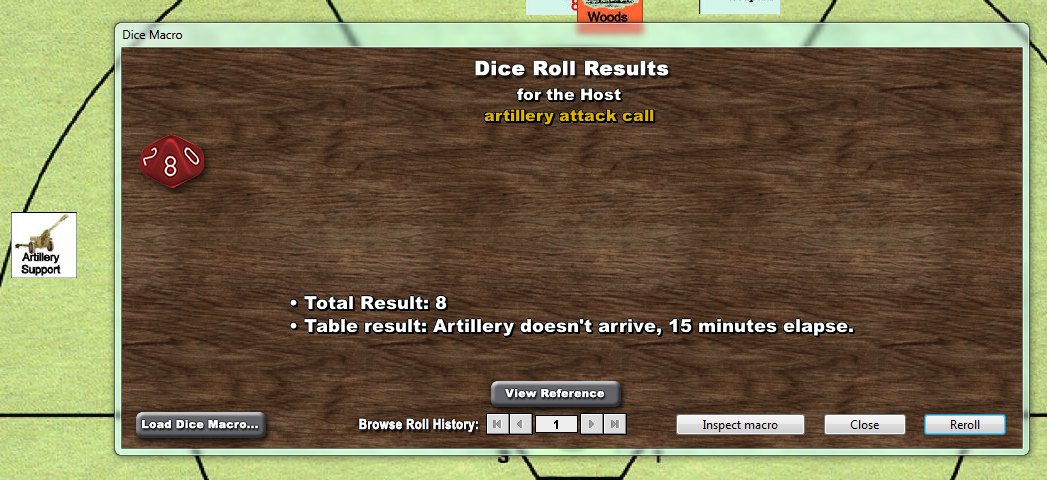
Note that this is one 10-sided die roll and the artillery call failed. Since this roll is resolved by referencing a simple table, I was able to set this macro up to automatically generate the result.
What do you do if the dice roll is not resolved by a simple table? You associate the appropriate results table to the macro and call it up for inspection by pressing the “View Reference” button on the Dice Roll Results screen. Here is an example of the dice roll that determines enemy unit placement on the battle board. It involves rolling four 10-sided die and cross referencing each die with one of the tables in the battle board placement table:
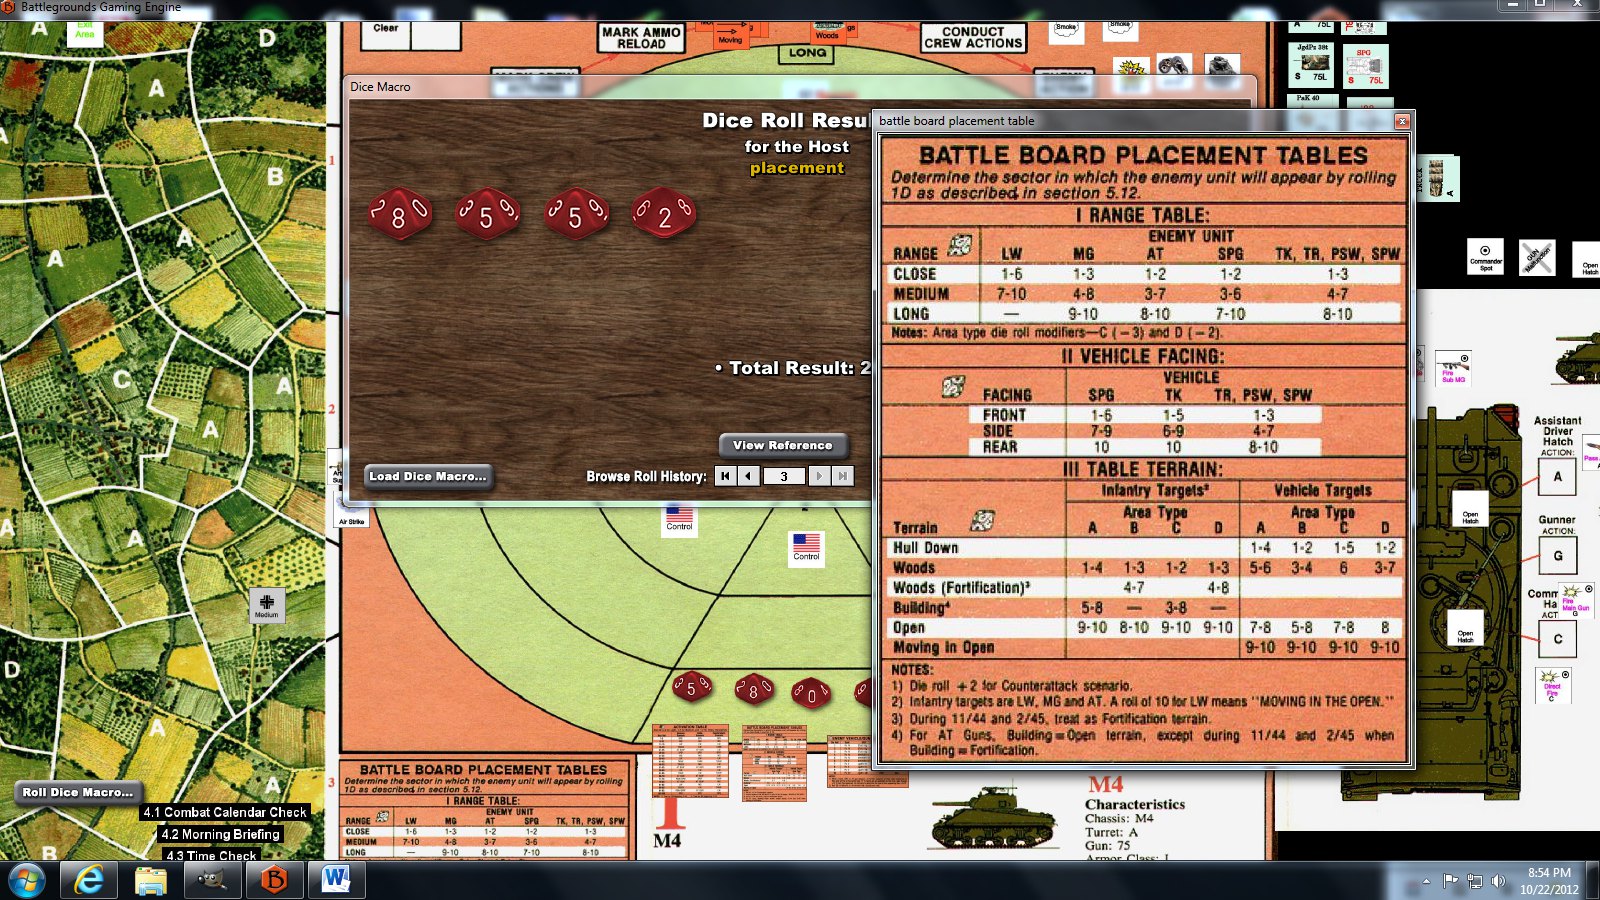
This table was called up by pressing the View Reference button. I no longer have to fumble through 4 different sheets of tables to find the correct one. Now I just push a button!
One other thing I’ll do frequently is create an area on the playing surface where I will set several die with frequently used tables. I’ll assign this to a view hot key and jump there to make dice rolls and reference tables. Here is an example of one such area:
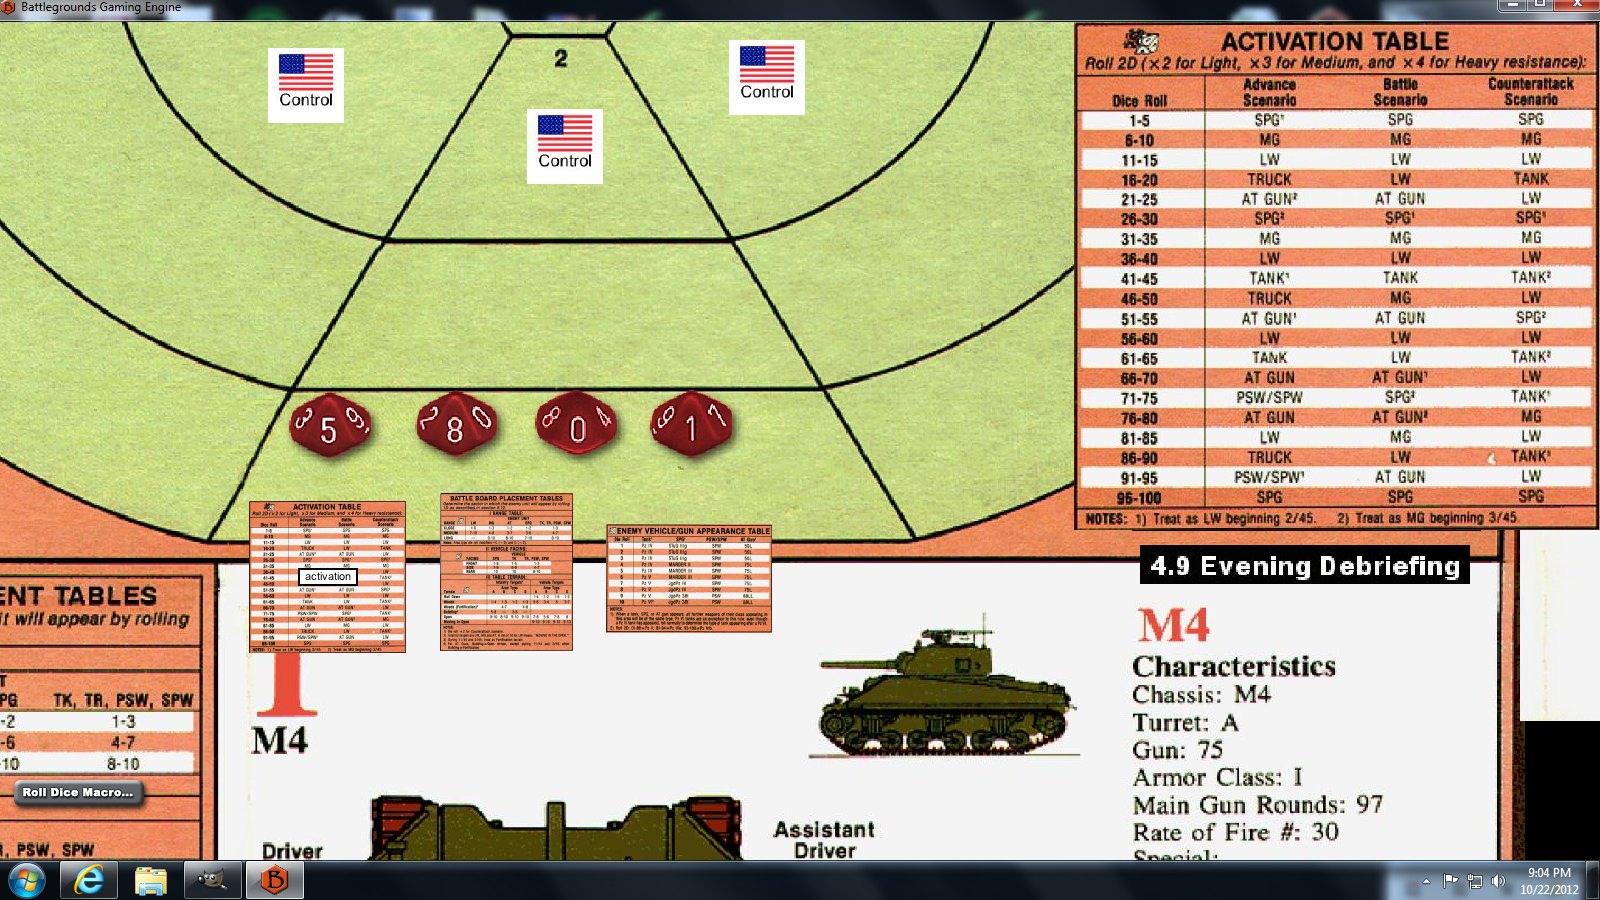
Just select the number of die you want to roll, press Ctrl-r and right click on a reduced table image and resolve the results. All of these dice rolling options keep game play rolling along smoothly.
Closing Thoughts
I don’t write reviews or endorsements for products. I’m usually just not impressed enough. But I believe that this program merits the time it has taken to put this together. It is unbelievably flexible. It seems that if I can imagine it, I can find a way to get it into the game. Something that still amazes me is that after a year of regularly working with the program, I still occasionally encounter little features I didn’t know existed.
What I’ve covered here barely scratches the surface of what this program is capable of. Hex based wargames are supported with hex grids that can be scaled and set up for unit snapping to the hex center. Counters can be rotated. The program allows you to play remote opponents. When you purchase the program you get one additional license that permits anyone with the demo program to connect and play head to head. I haven’t tried that yet, but maybe my predominately solo wargaming days are numbered. You never know. And if group gaming is your thing, you can add additional licenses at a nominal cost and host your dream multi-player grand strategy game!
The developer is very active with development work implementing program improvements based on user input. He is also active in the Battlegrounds forum. Every now and then I run into a program where it is obvious that it was developed and written by someone that actually has practical experience in the area the program was written for. That is very apparent in this case. I am struck by this impression all the time as I use the program. Things just make sense and fit together so well. I have as much fun creating a game as I do playing it. For me the whole process is rewarding as well as fun. You owe it to yourself to give this program a good hard look if you are considering virtual table top software. Download the demo, take a look at the manual and give it a go. You won’t regret it.